The Basement
The Housekeeper's Room
Well folks, I hope you are all well, your health's your wealth after all :)
Firstly, I just want to say a big thank you to Giac, Debora and Ilona for their wonderfully kind words and encouragement. It's lovely to know that there is someone out there with such kindness and willingness to look at what I'm doing. Thank you again, it's really appreciated.

My Housekeeper's Room - the picture seems very blurry, but it's not really!
Now, I had been waiting for months for my chosen wallpaper for this room, which was Les Chinoiseries 'Bourges', but I was browned off waiting and had to pick another from my stash as I felt this was holding up my decorating. I eventually chose 'Weeping Willow' from Brodnax. I really wasn't happy to change as I had the whole room decorated in my head (I have been known to go to sleep, decorate and finish rooms, only to wake up - realise I have been dreaming, and being soooo disappointed that I have nothing done!) You are probably thinking I'm a bit of a mad woman, and you'd probably be right :) - anyway, as it turns out, I love the new look of my housekeeper's room. I hope you do too!
Of course, within a week of starting this, the paper arrived, typical, anyway, I may use it for the nanny's room on the attic floor....better not get ahead of myself!
Now, as I have said before, I am totally new to this wonderful hobby, and, as I have also said, I usually don't do things by half. I decided to put a corner fireplace in here - boy did I have trouble with cutting the angles for the cornicing...... Thank goodness I have my hobby space in a cabin away from the house, because the language....dear me, not good.
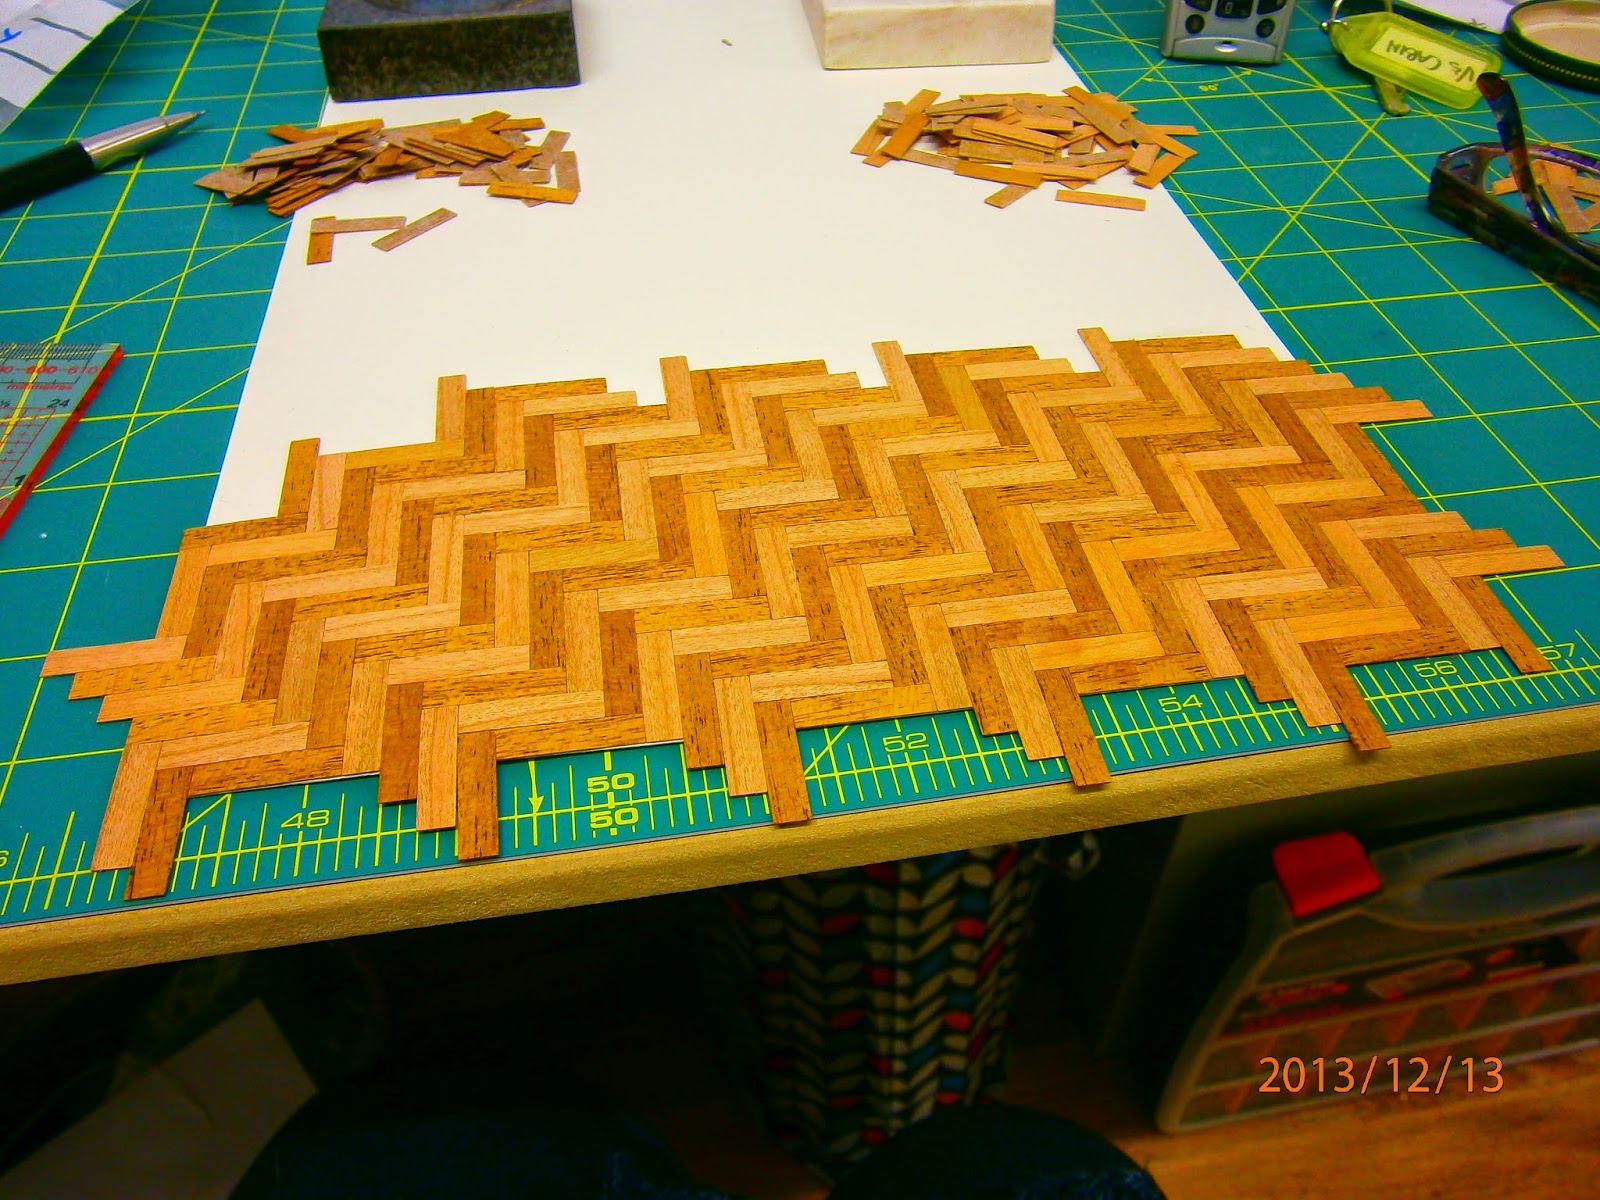
I made a template of the floor out of paper, then cut the shape from card and marked my centre lines lightly with pencil. I then covered the card with double-sided tape - I say tape, but it comes in an A4 size, and then started my parquet floor. I bought this flooring from dollshousetiles.co.uk and I was thrilled with the result. They are real 'slivers' of cherry and mahogany, lovely. I trimmed the bits sticking over the edge - I needed to do that to continue with the pattern. I lightly sanded the floor and just applied some bees wax to finish.

I papered the room and inserted the door - after having to scrape off some of the top of the opening - I explained the panic of the doors not fitting in my previous blog.
I then drilled a little hole in the back wall for the wiring for my fire and glued in the corner fireplace.
But I couldn't leave it at that, I needed to make a new wall/chimney breast for my little angled friend, just to make the room more real. I glued a couple of triangular bits of wood to the walls where I wanted the new wall to be. I cut a piece of thin wood, chamfered the edges and then wallpapered it. Now, in hindsight, it was a stroke of luck that my original choice of wallpaper didn't arrive, why? I hear you say. I'll tell you why; the original paper had a very distinct pattern to it, and it would have been a nightmare for me to match it up. The pattern I chose was brilliant. It is an all over leafy sort of design and when the new wall over the fireplace went in, it blended brilliantly, eventually.
I first papered the wall before gluing it in. But when I did that, it looked awful, there was a gap on each side which I just couldn't look at, so out it came before it stuck fast.
I really should remember to take more photos, but I find when I am really concentrating I just forget until it's all done then I go....I didn't take a picture of that.. :(
Anyway, I ripped off the paper and had a good old think. So on papering the new wall again, I lined up the paper with the bottom of the wall (that was going to sit on the mantle of the fireplace), and cut the paper about two millimetres (1/16th ish) wider on each side of the wall, so that when I placed the wall in position, the longer sides blended into the existing paper and left no gaps between the existing wall and the new. If you follow me. I also had to trim the skirting board to mould to the shape of the fireplace.

I love this little room, I think it is cosy. I dressed the bed myself. The little pillowcases and sheets I made from an Irish linen handkerchief with a piece of cotton lace attached, I'm very proud of the bed, I think it turned out very well - even if I say so myself!

Before

After

The finished corner fireplace, I have knitting on the go on the fireside chair!


The rosary beads and sacred heart picture are a nod to my mother-in-law. A wonderful woman with a very strong faith who raised a house of seven, six boys and a girl. I married son number two!
The reading glasses are in a little leather pouch.

My housekeeper loves to read, and she also has a sweet tooth, can you see the jar of boiled sweets on her shelf? Cross-stitch and a sewing basket on the floor are a reference to my hobbies.

The lights are on, but there's no-one home.....or is that me I'm talking about :)
There are lots of 'fancy' items in this little room, quite posh for a housekeeper, but the lady of the house is very fond of her, so when she was getting new hat boxes and luggage, she kindly donated her used ones to her housekeeper. That's my excuse for putting them here! :)
I have come to the conclusion as to why I find this whole project so amazing. You really have to use your head.
Not only are you an interior designer, a decorator, a carpenter (of sorts..in my case!) but a combination of everything together. I think it's the challenge of wanting to do something - having a vision and trying to figure out how to achieve that.
There, that's my philosophy for today! :)
I hope you have enjoyed this blog and I'll be back soon with more exploits from Fox Manor.
All the best,
Vivian


